

This post may contain affiliate links. Please read our disclosure for more info.
It’s your least favorite moment in your otherwise wonderful yoga class: you’re 30 or 40 minutes into class when your yoga teacher tells you to enter yogi squat (garland pose), place your hands on the mat in front of you, and practice crow pose – and, “if you’re feeling like it, enter headstand and jump back to chaturanga when you’re done!”
Yeah, yeah – yoga is about the journey into the pose and you’re not supposed to compare yourself to others on the mats around you, but you’ve been trying to master this pose for months and you just can’t understand why its nearly unattainable!
Mistakes Beginners Make During Crow Pose
Here are a few reasons why you may be having trouble mastering crow pose, with tips on how to correct them. They are the common mistakes that beginners make in crow pose:
- Your hand placement is wrong and you’re not gripping the mat: your hands should be placed flat on the mat directly in line with your shoulders with fingers spread wide so that they can root into the ground. Visualize gripping the mat with each finger, as if you’re climbing a rock wall – this will keep you from dumping the weight into the wrists.
- Your arms and elbows are splaying outward away from your body: your elbows must bend at a 90-degree angle, stuck right next to the body – just as though you’re in chaturanga. A common mistake is allowing the elbows to splay outward, making a wider base – many students think this makes entering the pose easier, when in fact, since your elbows are further away from your center of gravity, it’s harder (not to mention there is more room for injury due to bad alignment!)
- Your core strength is lacking: believe it or not, crow relies more on core strength than on arm strength. Your arms are simply creating a shelf for you to place your body weight on – it’s your abs that must lift your bodyweight upward to maintain stability.
Some tests to determine if your core is strong enough for Crow:
- Hold boat pose for 30-60 seconds
- Hold forearm and regular plank for 60 seconds or more each
If you are unable to hold these, you are not ready to be practicing full crow pose – work on your core strength until you are able to hold these poses for ample time, and you will find that the next time you practice Crow, it will be much easier – and you probably won’t be at risk for injury!
- You’re relying on friction instead of strength to hold your legs up: let’s go back to #3 – this pose relies on your core to lift your body weight upward – Crow is not achieved by simply sticking your knees on the back of your triceps and hoping that friction will make them stick.
- You have a straight back: wait what, you want me to round my back?! That goes against almost everything I thought I was supposed to do! Going back to #3 (again), your core is working super strongly to lift the bodyweight upward – you’re doing this by scooping the bellybutton in, toward your spine. Rounding the back allows you to lift your core higher, which then lifts more weight out of your elbows.
- You’re looking straight down: (I mean, obviously – we naturally look forward). Though it’s natural to look straight down at the ground since that’s where your head is facing, you must look outward in front of you at the ground, approximately 3 feet away from you. Do not strain the head and neck upward, but do look outward to help counterbalance the forward-leaning weight as much as possible.
- You’re full of FEAR (and rightfully so!): I mean, nobody wants to fall face-first on the ground – we’re literally primed not to do that. Putting yourself in crow pose with your face inches from the ground is an incredibly vulnerable position so you are completely within your right to be cautious.
How to Master Crow Pose
HOWEVER, if you perpetuate the feeling of fear, your body will tense up and your mind literally won’t allow you to get to where it needs to be. To overcome the fear:
- Start by practicing crow with a block under your forehead: enter crow, literally placing your forehead on the block, allowing yourself to transfer the weight into your palms. Experiment here until you feel more comfortable.
- Once you’ve done the forehead exercise, practice crow with a pillow, bolster, or rolled up blanket on the floor in front of your forehead: this will put your mind at ease knowing that if you fall forward, something soft will catch you.
- Lastly, to gain awareness of where your feet should be, place a block under the toes in crow pose: allow your weight to shift forward and backward, until you are able to lift one foot (and eventually both feet) off the block into full Crow.
I kid you not, when I first started practicing Crow, it took me over 6 months. I couldn’t understand why – my core strength checked out, I had my elbows, wrists, and shoulders in correct alignment, but I just couldn’t do it.
It was until I simply placed a small pillow on the floor in front of face that I was able to enter Crow – and I didn’t even fall forward! My fear was holding me back the entire time; by mind was not allowing me to shift my weight as far forward as I needed to, because it was subconsciously protecting me from the danger I perceived to exist in falling forward.
How To Do Crow Pose (Correctly)
Follow these step-by-step instructions, and you’ll be flying into Crow in no time:
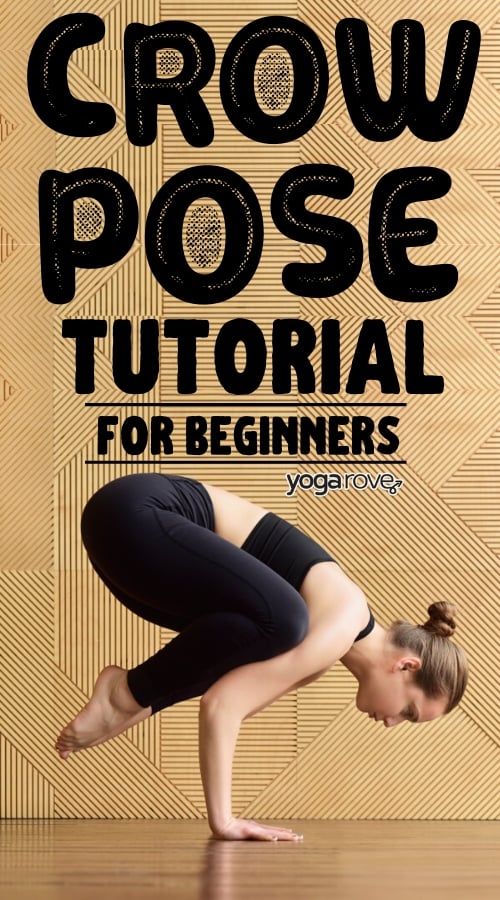
- From yogi squat (malasana), place the palms on the mat in front of you at shoulder-width’s distance. Fingertips spread wide, middle fingers pointing forward. Grip into the finger pads and spread the weight evenly throughout the edges of the palm so that you are not dumping into the wrist.
- Keep the feet on the mat as you engage the core to lift the hips upward to the sky, rolling onto the balls of the feet. As you start to shift your weight forward, make sure your triceps and biceps are pulling in toward your ribcage, so your elbows are not splaying outward from the body.
- Keep your gaze on the floor approximately 3 feet in front of you.
- Bend into the arms so they become a 90-degree angle; a shelf for your knees.
- Bend the knees (keeping the core engaged and hips lifted) to place one knee at a time on the triceps. You do not have to lift your toes off the mat if you are not yet comfortable.
- No matter what, keep looking forward – do not look to the ground, or else you will go there! Where attention goes, intention flows – let’s keep your intention out in front of you, face off the ground ????
Modifications for Crow Pose
Let’s revisit some of the modifications for Crow Pose you can apply here in case you’re not comfortable with the full expression yet:
- Place a block on the ground directly under your forehead. When you lean forward, place your forehead on the block, and allow weight to shift into the forehead. Shift the weight forward and backward to get a feel for where the center of the pose is.
- Start the pose in a modified squat – place just the balls of your feet on a block and enter squat, so that when you place your palms on the mat in front of you and enter crow, your feet are supported by the block. Lift one foot off the block at a time.
Benefits of Crow Pose
Why should you even care to attempt crow pose? Well, there are actually quite a few benefits you can get from attempting this intricate arm balance:
It’s a solid base pose. Crow is the basis of any arm balance – once you master it, the rest is pretty much just figured out new places to put your legs.
It’s empowering. Achieving crow is similar to the feeling of conquering headstands and handstands – it requires a lot of effort, physically and mentally, so it’s extremely gratifying to finally conquer something that was once unconquerable.
It’s another way to build strength. Your core, arms, and inner thighs must all work together to keep you floating – it’s like combining Chaturanga and Boat into one pose!
It reminds you that falling is okay. Setbacks happen – progress is not linear. Sometimes we get frustrated at work or in our personal lives when things don’t go exactly as planned. We forget that when we fall, it’s an opportunity to get up. Falling in crow (and getting up and trying again) is a reminder that there is always another chance to pick yourself up – everything will always be alright.
“What if I fall?”
“But darling, what if you fly?” – Erin Hanson
Remember, the only way you WON’T master crow pose is if you stop trying. Practice, practice, and practice some more! You WILL get it.
To get yourself ultimately ready for crow pose, check out our resource library full of free yoga printables.
What’s your biggest struggle with crow pose? Let us know in the comments below!
Previously a dancer, Ashley has been practicing yoga for over 15 years and teaching for 5.
She balances an executive-level “corporate” position during the day with healthy, mindful wellness practices in her free time to stay grounded; she lives on celery juice and cold brew, and can’t live without her dark chocolate!
Lmao I have been practicing crow pose for 6 months but have never been able to hold it for more than a second or two. Had a feeling it was my balance. I’ve been researching it lots and I understand the mechanics and have the strength to do it as I practice yoga an hour a day and have for almost a year. So… I tried the block under my forehead and held crow pose for about 20 seconds barely putting any weight on my head at all just using the block as a guide for where my head should be…. I was very proud and felt confident giving it another shot and got up in it quickly… too quickly and for the first time ever fell on my face ??? thanks for the tip ? I think I’ll make use of the block to help my body learn how far forward I have to go to balance before I get rid of it.
Love this! Sometimes the fear of falling is the only thing holding us back 🙂 And don’t worry we’ve all had many face plants ourselves haha! Good luck, glad the tip was helpful!
This helped so much! I had my hands too close to each other. Placing them in front of my shoulders was the fix 🙂 thank you :):)
Awesome, so glad you found it helpful Erika! 🙂
I really like how empowering this piece was. I struggled with the pose during a class and felt very frustrated. As though I wasn’t enough and failing. Thank you for helping to put things into perspective and sharing these wonderful tips. I’ll keep trying, my elbows are definitely spread out! It’s nice to know others have spent months trying to get this.
Yes definitely! You are not alone don’t worry- this was a big struggle for me when I started as well- I found blocks very helpful for allowing me to focus on my arm placement so I didn’t have to worry about that and balancing at the same time. Just keep practicing 🙂
This is a pose as kids we used to do on the front lawn along with cartwheels etc. could stay up for alot longer than a few seconds. who knew 🙂 . probably best to have a “spotter” the first few times.
Haha yes! And yes definitely or you can make sure you have a pillow, blanket or block in front of you 🙂
Still can’t do it but not because this wasn’t SUPER helpful. I managed to hold it for a split second, which is light years ahead of what was happening before. Thanks for this!
That is still amazing Trinka! So glad you found it helpful 🙂
The block was very helpful. I could not do crow pose for more than a couple of secs. Then you taught me about putting the block first and I was able to hold the pose for 10-15 seconds, I was screaming after I did it. I’ll keep using the block. Thanks so much. And I had been practicing yoga for 6 months now.
So happy to hear that it helped Kristine! What an awesome accomplishment!