

This post may contain affiliate links. Please read our disclosure for more info.
Do you ever wonder how some people are just so flexible, and you’re, well…not?
It can be very intimidating when you’re new to yoga, and you see someone do a full split while you’re sitting there wondering how to even begin to conquer that pose.

Well let me be frank with you for a moment. Some people are just naturally flexible, and some people (me included) just need to work a little bit harder to get to those results.
Don’t think that naturally flexible people have it easy, they still have their own challenges they are trying to overcome, just as you will when you conquer this one!
But some of the people you think that are just naturally bendy really aren’t… they have just put hard work and dedication into reaching their goals.
The key to obtaining the results you want is consistency and focus.
You can’t just give up after trying one time and failing. Give yourself more credit than that!
I know you too can reach your goals, and I know it is overwhelming when you first start out. I had no idea which yoga poses were best to start with to improve flexibility before moving onto more advanced poses.
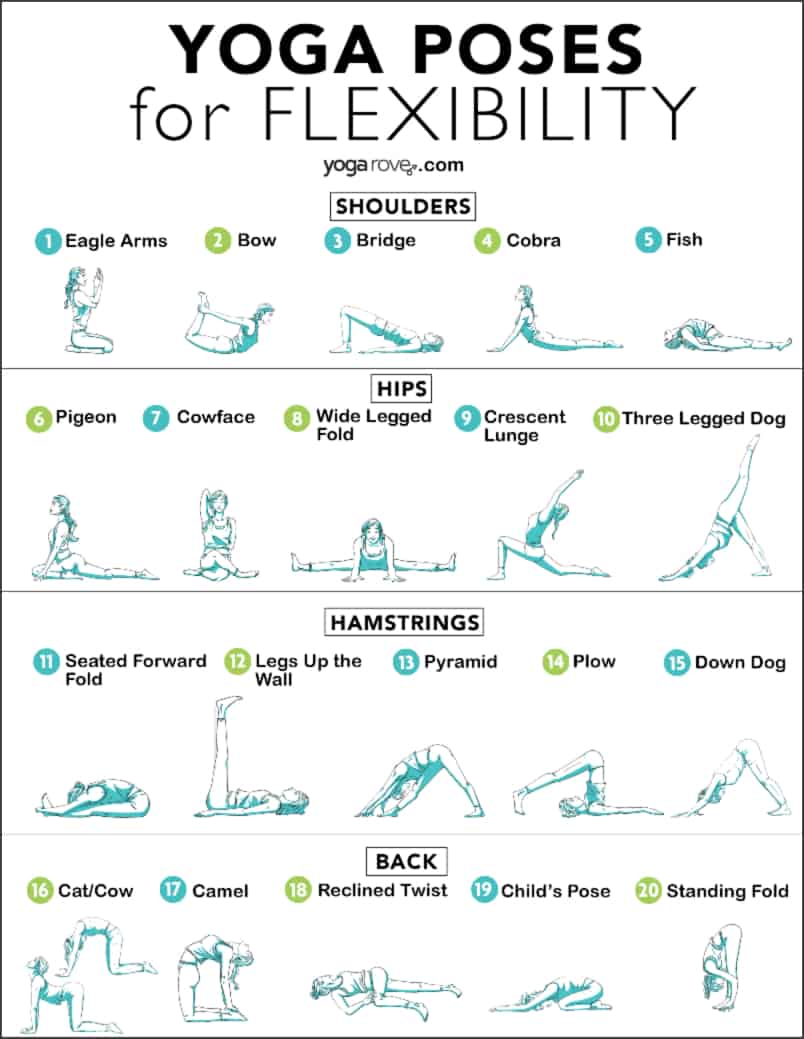
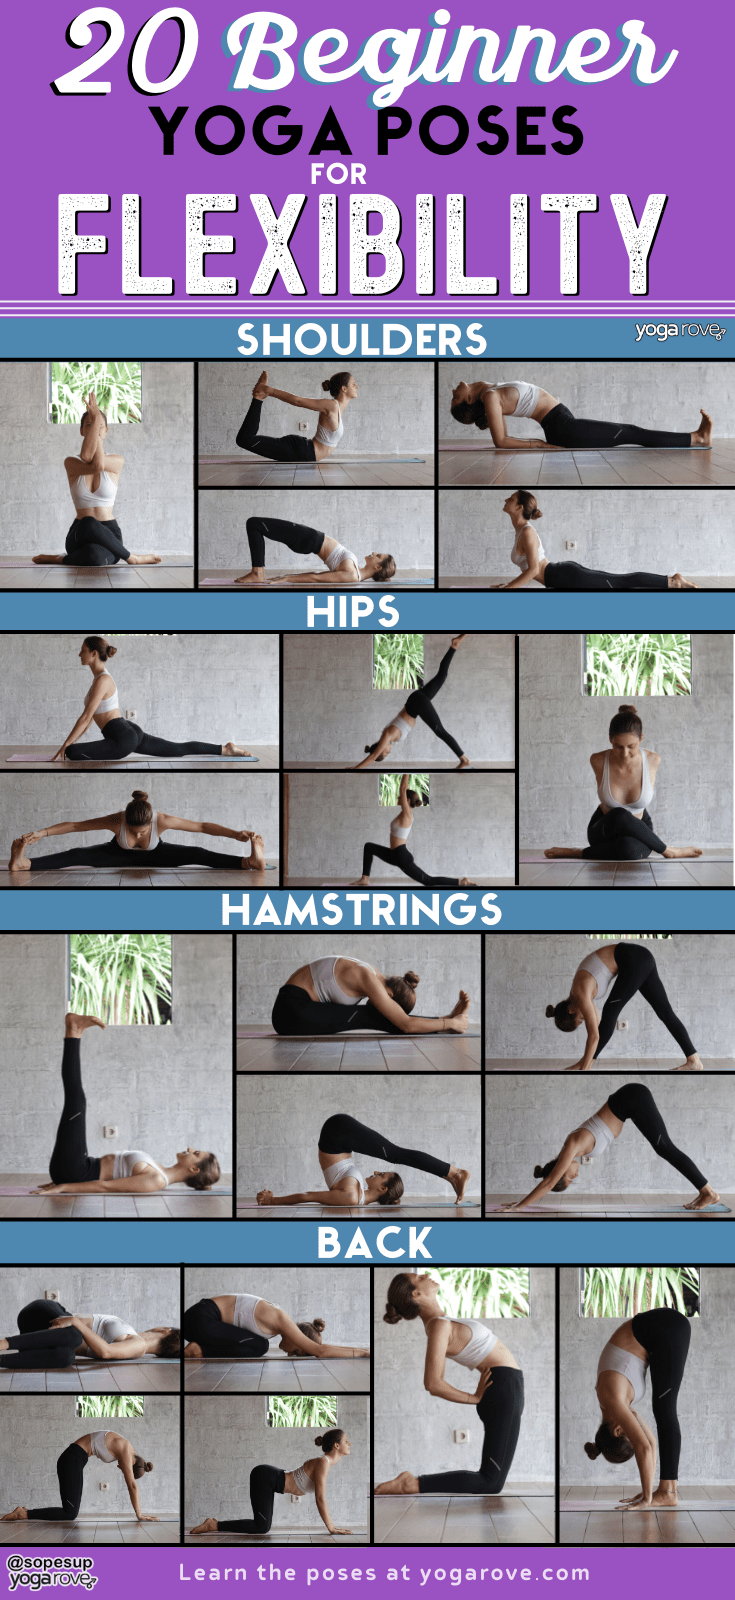
So I’ve created a list of the top 20 beginner yoga poses to improve flexibility. I have organized them into four groups: Shoulders, Hips, Hamstrings, and Back. I tried to provide as many variations for beginners as I could to help you safely and effectively improve your flexibility!
If you’d like the printable for these poses, sign up to access it in our free resource library below!
To start, I would hold each pose for about 5 to 10 slow breaths (this equals about 15 to 30 seconds), and then you can increase as time goes on.
20 beginner yoga poses for flexibility:
SHOULDERS
It is very common for people to hold tension and tightness in the shoulders due to poor posture and prolonged sitting. The following poses are great for opening up the chest, shoulders, and surrounding areas, such as the neck.
1. Eagle Arms Pose (Garurasana)
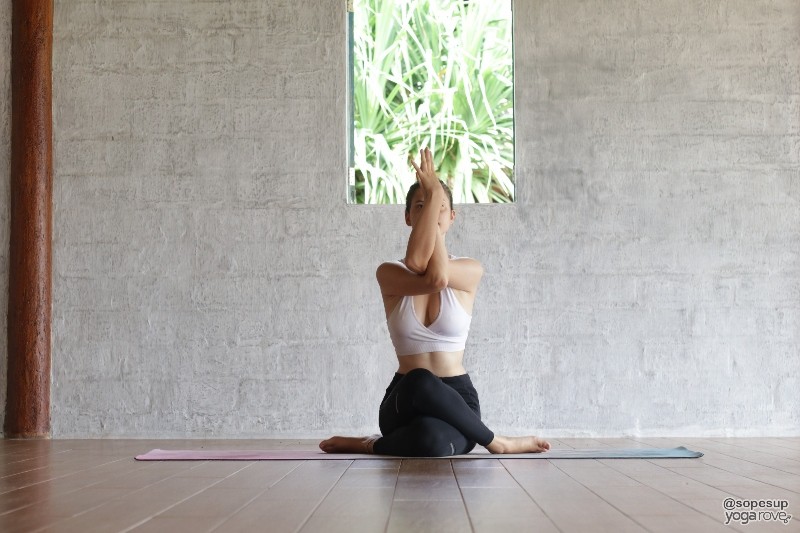
Eagle arms provide a great stretch for both shoulders. The pose shown here is a seated variation of Eagle.
You don’t need to have stacked legs if you have tight hips, you can simply sit in a comfortable seated position or stand while just practicing eagle arms.
How to do Eagle Arms:
- Start by standing or sitting, and place your arms in a goal post position, forming 90 degree angles on either side. Make sure your elbows are inline with your shoulders.
- Start to bring your arms in towards each other and place your right arm behind your left arm, so that your right elbow is resting on the inside of your left elbow.
- Now wrap you left arm as much as you can around your right arm, trying to touch the inside of your right hand. If you can’t completely touch it all the way that’s okay.
- Squeeze your arms in towards each other and actively bring them up to shoulder level.
Modification: If you are unable to do eagle arms, that’s okay. Instead of reaching for your hands to touch, simply allow your hand to grab your wrist or forearm, as long as you feel the stretch!
2. Bow (Dhanurasana)

Bow pose stretches the entire front body, and is especially great for those that sit at a desk all day and tend to hunch, as this pulls everything backwards while strengthening your back.
This pose may seem intimidating when first looking at it, but there are is a simple tool you can use to do it properly and safely that I’m going to show you so you can obtain the amazing benefits.
How to do Bow Pose:
- Start on your stomach with your hands along your sides with palms facing up. Bend your knees and bring your heels in as close as you can to your butt.
- Reach back with your hands and grab onto your ankles.
- If you are unable to reach back with your hands, get a yoga strap (these are the ones I recommend) or if you don’t have one, you can use a sheet or thin towel.
- On your next inhale, slowly lift your thighs off the floor and pull your heels away from your butt. This will naturally lift your chest and pull back your shoulders.
Modification: If you’re using a strap, Instead of reaching back with your hands, wrap the yoga strap around your ankles and use your hands to grip the strap while pulling back on it.
- Make sure your knees and legs stay hip width distance apart, not wider, for the duration of this pose.
- Make sure to keep your shoulders away from your ears and your head in neutral position.
- Repeat on the other side by switching the arm that is underneath.
3. Bridge (Setu Bandha Sarvangasana)

Although Bridge Pose is widely known for the positive effects it has on treating back pain, it is actually an amazing pose for your shoulders as well!
To get a deeper stretch in this pose, instead of keeping your arms and hands flat on the ground, you can clasp your hands together and pull your shoulder blades in for the duration of the pose. Just make sure to keep your shoulders on the ground.
This is a bit of a more advanced variation so if you’re not ready for that yet, simply keeping your hands on the ground will do a great job at opening your shoulders as well!
How to do Bridge Pose:
- To do bridge, lay on the ground with knees bent and your feet flat on the floor. Make sure they are inner hip width distance apart.
- Lift up just enough and shimmy your shoulder blades underneath you. Bring your feet in as much as you can so your fingertips can touch your heels.
- Keep your arms and hands at your sides flat on the ground. On your next inhale, slowly lift up through your pelvis, keeping grounded feet and hands. Make a conscious effort to keep the tops of your shoulders on the ground.
- Lift with your hips throughout the pose as you actively either clasp your hands or press them towards the floor.
Modification: If your shoulders are too tight to bring your hands together, feel free to leave them pressed into the mat, or grab a yoga strap and use it to gradually bring your arms together by gripping the strap.
4. Cobra (Bhujangasana)
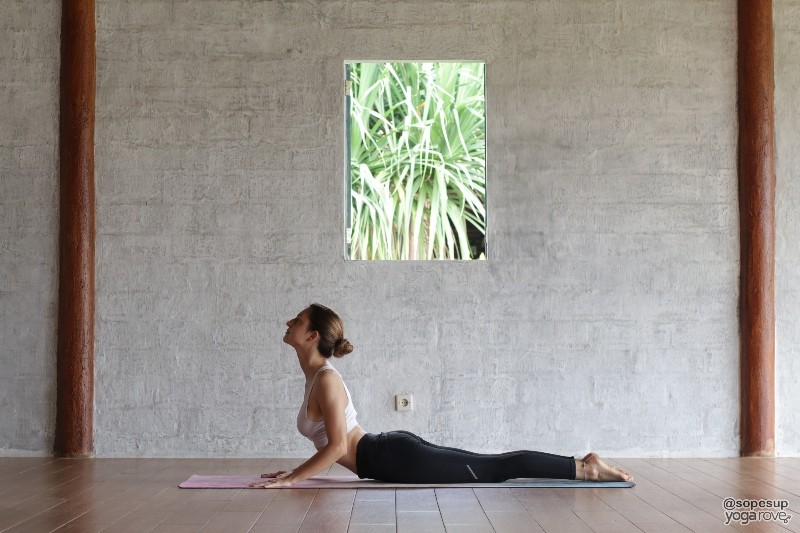
Cobra Pose is a mild backbend that is perfect for beginners trying to improve their shoulder flexibility and open up their chest.
It’s important to make sure you do not overdo the backbend, as doing so could strain your back.
How to do Cobra Pose:
- Start belly down on the floor, with forehead facing down and hands spread underneath your shoulders. Hug your arms into your sides.
- Your legs should be spread out behind you, inner hip width distance apart and the tops of your feet flat on the ground.
- Take a deep breath, then on your next exhale, push up with your hands while lifting through your chest.
- Make sure to push through your pelvis, legs and feet to keep them grounded and distribute the backbend evenly.
Modification: If you feel tension in your back while doing this pose, spread your legs out wider. You do not need to come into full cobra- if you feel a stretch in Baby Cobra, stay there.
5. Fish (Matsyasana)
Fish pose is used as a counter pose for inversions such as Shoulder Stand and Plow Pose because of how great it is at stretching the shoulders.
How to do Fish Pose:
- Start on your back with legs flat on the floor and hands by your sides.
- Slightly lift your pelvis and slide your hands underneath your butt.
- On your next exhale, press your forearms into the floor and pull your scapulas into your back while lifting your head and torso off of the floor.
- You can make the backbend as mild as is comfortable for you, but make sure to keep your forearms planted to get the shoulder stretch.
Modification: Feel free to place a block underneath your back for extra support. In this case, you would spread your arms out wide instead of keeping them by your sides.
HIPS
Tight hips are one of the most common complaints from people first starting with yoga. They don’t realize they have tight hips until they see they are unable to do certain poses such as yogi squat or pigeon pose.
6. Pigeon (Kapotasana)
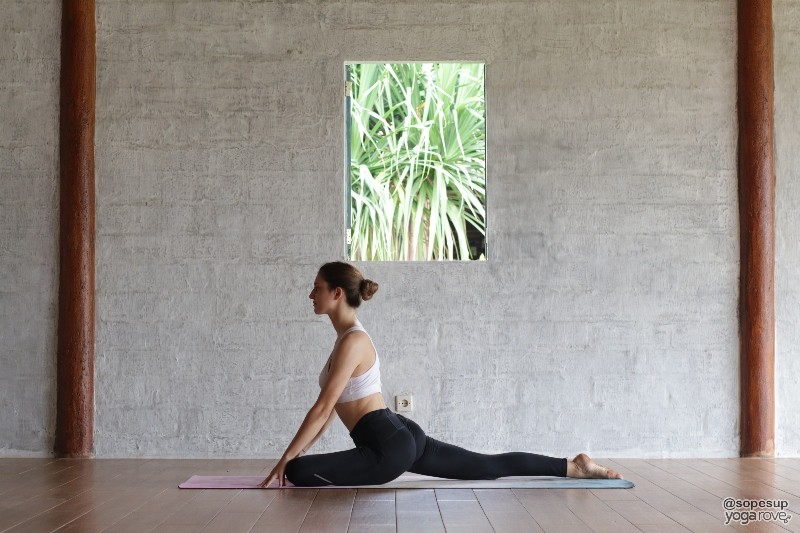
Pigeon Pose is great for stretching your hip flexors, and it is also a great way to relieve tension throughout your body.
Make sure you take deep inhales and exhales in this pose to receive the maximum benefits and release all of your tension.
How to do Pigeon Pose:
- Start in Downward Facing Dog, then lift your right leg into the air.
- Crunch your right leg into your center and then slide it to the back of your right wrist.
- The further forward you push your foot (making your leg parallel to your mat), the deeper the hip stretch will be, so adjust to what is comfortable for your body. Make sure to keep your right foot flexed to protect your knee.
- Your back toes should be untucked with your left leg resting on the ground, rotated inward.
- Place your hands on either side of your legs and take a second to make sure you are distributing your weight evenly between both hips.
- You can choose to stay here with your arms by your ears, on the floor next to your hips, or for a deeper stretch, you can slowly fold forward
Modification: If you can’t do full Pigeon Pose, you may need to make the angle of your leg less intense. Try placing a block underneath the hip where you leg is bent to decrease the intensity but still get a good stretch.
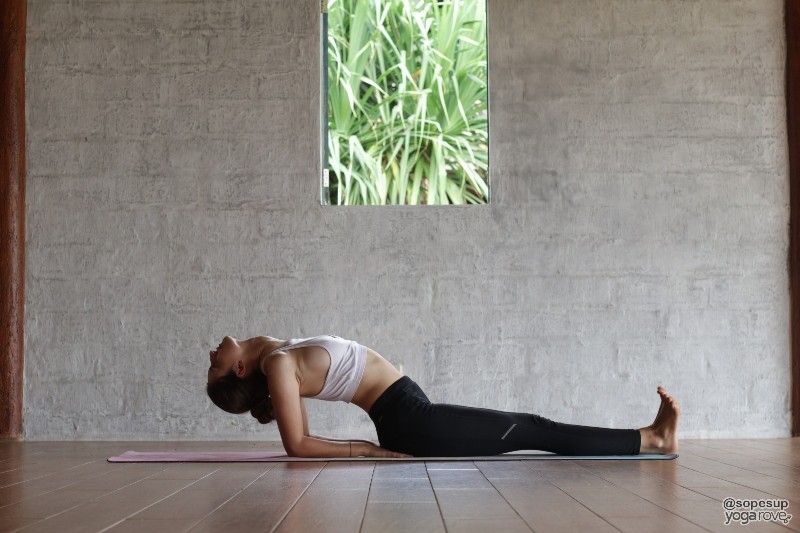
7. Cow Face Forward Bend (Adho Mukha Gomukhasana)
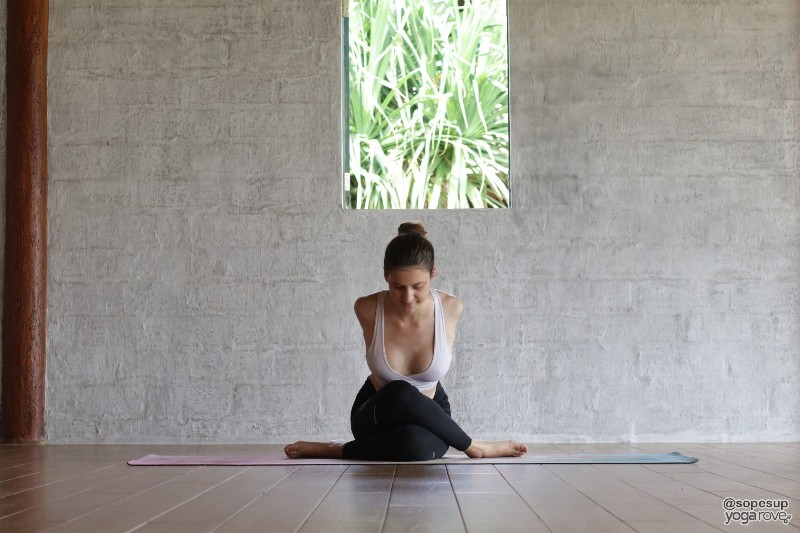
This is a great pose to give you a nice deep stretch in your hips, and is a great pose for those suffering from sciatica.
You can choose to bind your arms (as shown above) or just simply place your hands on the ground in front of you as you fold. The key here is the legs.
How to do Cow Face Forward Bend:
- Start in a seated Staff Pose position.
- Cross your right leg over your left and then bend both knees and slide both feet back towards your hips.
- Your right knee should be stacked on top of your left now.
- Sit tall and place you hands by your sides. At this time you can choose to clasp your hands behind your back, or you can slide them in front of your legs and you slowly fold over your legs.
- You will feel a deep stretch in one of your hips. Make sure to repeat this pose on the opposite side to maintain balance in your body.
Modification: Do not feel the need to bring your arms into a bind, you can simply bring them out in front of you. Also, if you cannot stack your knees due to tight hips, try stacking your calves instead.
8. Wide Legged Seated Forward Fold (Upavistha Konasana)
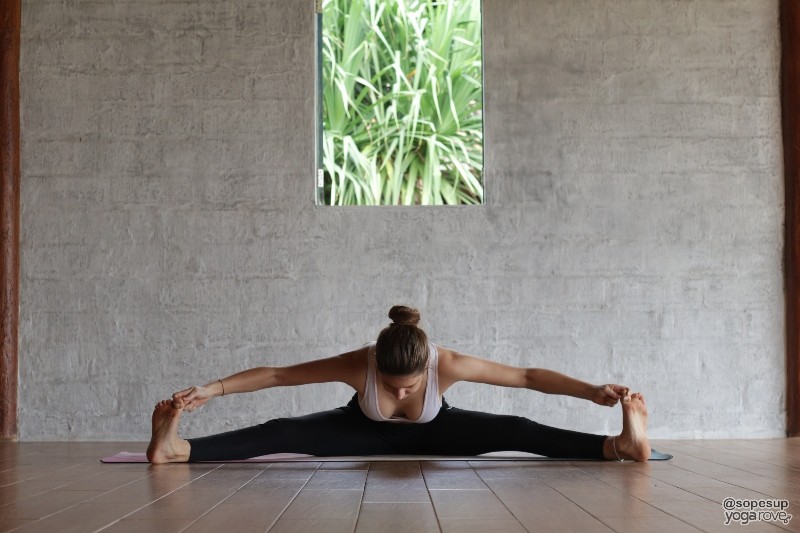
Folding yoga poses have so many benefits in themselves, but Wide Legged Seated Forward Fold is especially great at targeting the hips due to the wide stance.
How to do Wide Legged Seated Forward Fold:
- Start in Staff Pose. Spread your legs out as wide as you can while still maintaining a comfortable seat.
- Flex both feet and make sure they are facing directly up at the ceiling by rotating your thighs.
- With a straight back, lift your arms up overhead before you slowly fold over the middle and reach your hands towards opposite feet.
- It’s okay if you can’t grab your toes here, you can grab onto your ankles or shins as well.
Modification: Use a pillow or bolster in front of you to provide more support if you find it hard to fold your torso forward.
9. Crescent Lunge (Anjaneyasana)
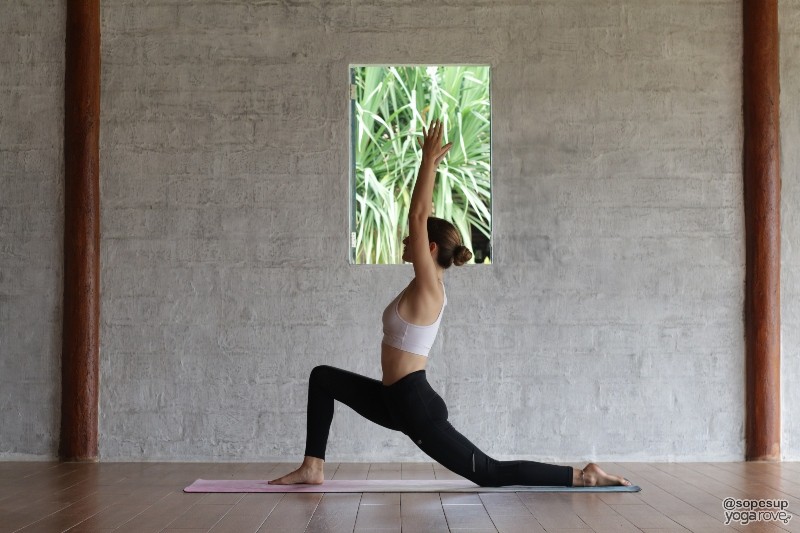
This is one of my favorite poses to do when my hips are feeling extra tight. You feel the stretch instantly and the best part is you can control the severity of the stretch by how much you lean forward.
How to do Crescent Lunge:
- Start on your knees, then bring your left leg forward with your foot flat on the ground. Untuck your back toes.
- With control lift your arms overhead as you start to push your hips forward, sinking into your left knee.
- As you do this, slightly arch your back and lift through your chest.
- If this is too much for you, try placing both hands on your left knee and using them to slowly push forward.
- Make sure to repeat this stretch on the other side. Remember, take it slow and breathe into the discomfort to release all of your tension!
Modification: Place your hands on your front knee for stability and to allow yourself to better control the intensity of the stretch. Pulsing in this pose also helps if you find it very uncomfortable.
10. Three Legged Dog (Eka Pada Adho Mukha Svanasana)
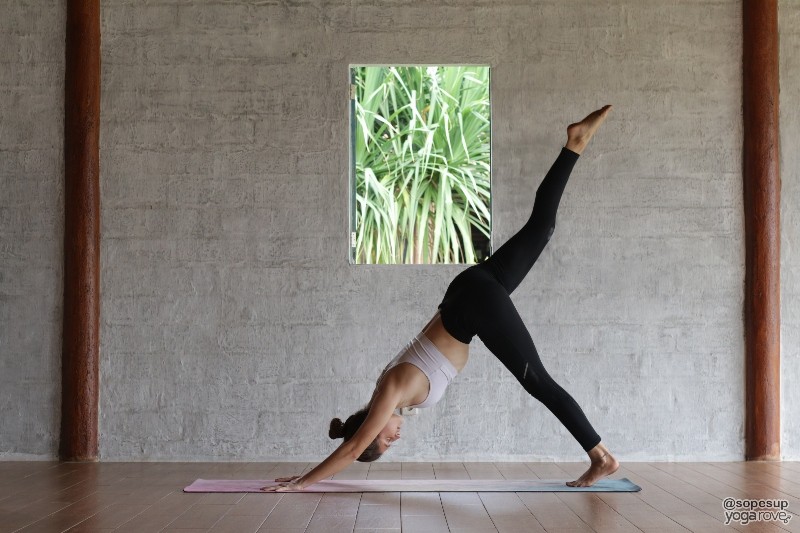
This is similar to Downward Facing Dog, except you are lifting one leg into the air, hence the “Three Legged” name. It is also sometimes referred to as “One Legged Dog” because you are only using one leg.
How to do Three Legged Dog:
- Start in Downward Facing Dog.
- Make sure you are distributing your weight properly throughout your entire body. You will know you aren’t if you feel an intense amount of weight on your arms.
- If this happens, try engaging your core and pushing more through your heels.
- Once you feel grounded, on your next exhale, lift your right leg straight up into the air as high as you can.
- You will immediately feel your right hip open up. For an even deeper stretch, try bending your right leg and opening your hip up to the right side of the room by moving your foot foot towards the left side of your body.
Modification: If you find all of the weight coming onto your upper body, try using two yoga blocks under your hands to elevate the upper body and allow you to focus more on the hip opening portion of this pose.
HAMSTRINGS
Whether you’re a runner, sit at a desk, or are new to yoga, most likely you have tight hamstrings. Implement poses that relieve tight hamstrings is so important as tight hamstrings can cause other ailments such as lower back pain.
11. Straight Legged Seated Forward Fold (Paschimottanasana)

Another seated forward fold pose, but you will feel completely different when you do this one. You will feel the stretch mainly in your hamstrings.
How to do Straight Legged Seated Forward Fold:
- Start in Staff Position and flex both feet.
- Move any extra skin to the side so that you are sitting directly on your sits bones.
- Lift your arms up overhead, then slowly fold over your legs, reaching for your toes, ankles, or shins.
Modification: A strap would be very beneficial here to get deeper into the stretch and obtain the most benefits. Wrap it around your feet and grab onto the strap, walking your fingers forward on the strap to get a deeper stretch.
12. Legs Up the Wall (Viparita Karani)

This gentle pose will give you an overwhelming sense of calm and relief throughout your entire body, while helping you making substantial progress in improving your hamstring flexibility.
All you need is a wall!
How to do Legs Up the Wall Pose:
- Start by lying as close as you can parallel to the wall with your left hip perpendicular to it.
- Lift your legs up and gently slide them onto the wall.
- Try to scoot as close as you can so your legs are flat against the wall, and flex your feet.
- Relax your top body and place your arms straight by your sides.
- Keep your feet flexed throughout this pose and push through your heels.
- Take deep inhales and exhales. This is a very gentle hamstring stretch so you can stay in this pose a bit longer, anywhere from 5 to 10 minutes.
- When coming out of the pose, bend your knees or gently slides you legs off the wall and come onto your side.
Modification: If you find your back hurting in this pose or you cannot straighten your legs, place a blanket or pillow underneath you sacrum for more support.
13. Pyramid (Ardha Parsvottanasana)
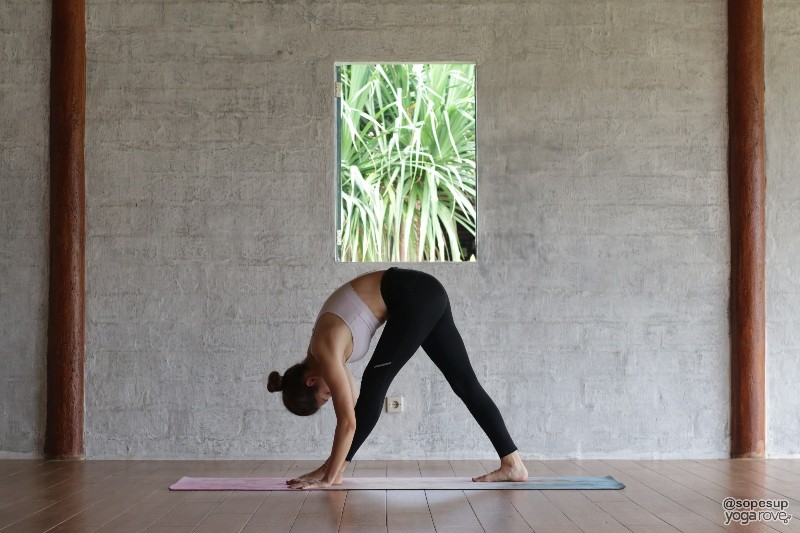
This pose is also known as Intense Side Stretch, but don’t let the name intimidate you! It does give you a deep stretch, but you can use yoga blocks to adjust to your level based on your tightness.
How to do Pyramid Pose:
- Start in Mountain Pose, then step your left foot about 3 ½ to 4 feet behind you. You only want to step it so far that you are able to still keep both heels grounded and both legs straight.
- Engage your thighs and completely ground your feet. Then take an inhale, and on your next exhale, fold hinge your upper body forward.
- You can clasp your hands behind your back for a shoulder stretch as well, or you can take two blocks and place them on either side of your front foot. Adjust the height of the blocks based on your tightness and use them for support to fold in deeper.
- You will feel a deep stretch in your hamstrings, and your initial reaction may be to get out of it. When this happens, use your breath to come back to center, and release all of the tension and tightness in that leg with every exhale.
- Repeat on the other side. You may notice one leg is much tighter than the other.
Modification: Using a yoga block on either side is the best way to provide yourself support while still deepening into this pose. Adjust the height based on your tightness and gradually adjust.
14. Plow Pose (Halasana)
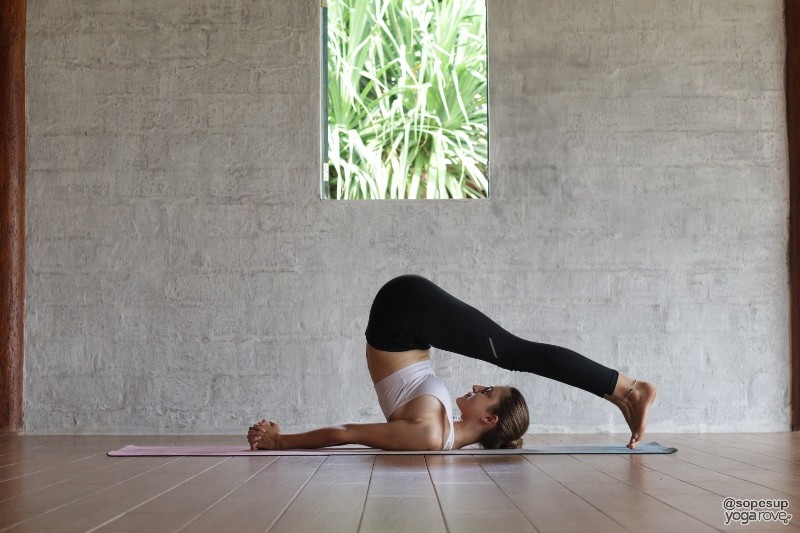
Not only is this pose super effective in stretching your hamstrings, but it feels amazing. You may not be able to touch the ground when you first start practicing, but with time your hamstrings will become more flexible and you will be able to!
How to do Plow Pose:
- Start on your back with your feet flat on the floor.
- Bring your knees into your chest with your feet flexed, and place your hands on your hips.
- Straighten both legs up towards the ceiling, keeping both feet flexed.
- Slowly and with control, begin to lower your feet over your head. Keep your hands on your lower back for support.
- As I said before, you may not be able to lower your feet all the way down to the ground, and that’s okay! Don’t bend your knees just so you can touch your feet, that will not stretch your hamstrings at all. With practice you will be touching the ground in no time 🙂
- If you can’t touch your feet to the ground, you may want to keep your hands under your lower back to feel more supported, or you can bring your arms to the floor. This is also a great shoulder stretch.
Modification: Do this pose in front of a wall and use the wall with your feet to try to deepen yourself into the pose. This will give you more support and control over how deep you decide to go.
15. Downward Facing Dog (Adho Mukha Svanasana)
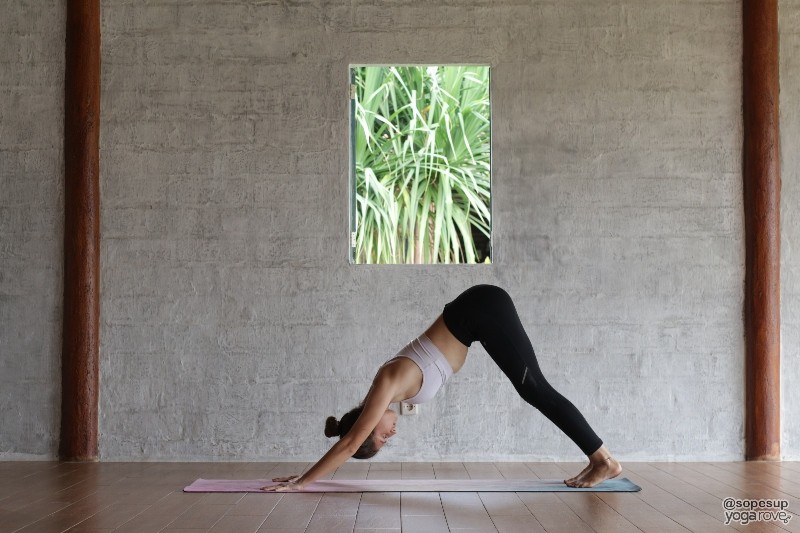
I think every person known to man knows what this pose is even you don’t do yoga. But the benefits of it are definitely underrated!
This is an all around great strengthening and stretching pose for your entire body, but is especially great for those of you trying to improve your hamstring flexibility.
You will most likely not be able to touch your feet to the ground when you first start, and it might take you a while to do so. Be patient and with time, you will see and feel a lot of improvement.
How to do Downward Facing Dog:
- Start on all fours with your feet inner hip width distance apart, toes tucked, and hands directly under shoulders.
- On your next inhale, push your hips up and back into the air.
- Really engage your core, your shoulders, and your legs. Don’t let your body just hang out in this pose. You will know you aren’t distributing your weight properly if you feel all the weight on your arms.
- Push through your heels. You feel feel a big stretch. Start to “pump” your legs by bending one at a time while you straighten the other to warm them up.
- Stay completely engaged throughout this pose and really push through your heels the entire time to get the best stretch.
Modification: If you feel too inflexible to do Downward Dog, try using two blocks under your hands for support, or try placing a blanket under your heels. You can also try doing this close to a wall with your heels on the wall for support as well.
BACK
Many people suffer from lower back pain from a variety of reasons. It can be from having a weak core, or simply not releasing tension in tight areas. The following poses are perfect for gently stretching all areas of your back.
16. Cat and Cow (Marjaiasana & Bitilasana)
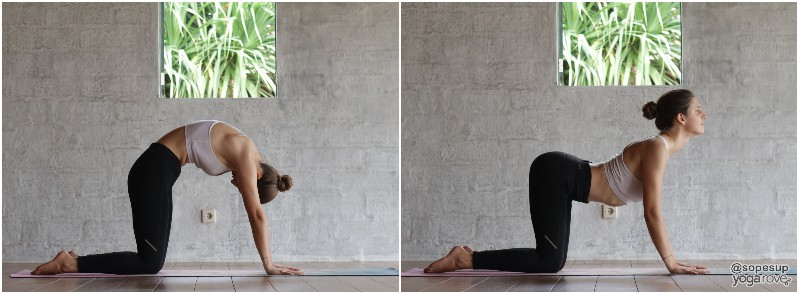
Although these are two separate poses, I include them as one as I believe you can’t have one without the other!
What makes Cat and Cow such great poses is the flowing sequence it creates to warm up your spine.
How to do Cat-Cow Pose:
- Start on all fours, you can choose to have your toes tucked or untucked. Make sure wrists are under shoulders.
- On your inhale, drop your belly, arch your spine, and look up to the ceiling. This is cow.
- On your exhale, round your spine, hollow out your belly, and drop your head to look at the ground. This is cat.
- Go through this flow a few times, and really take the time to feel out your body and any tight areas you may have.
Modification: If doing this pose on your knees is too uncomfortable, try doing a seated cat-cow instead. Simple sit in a tall position, and go through the motion of arching and rounding your back.
17. Camel (Ustrasana)
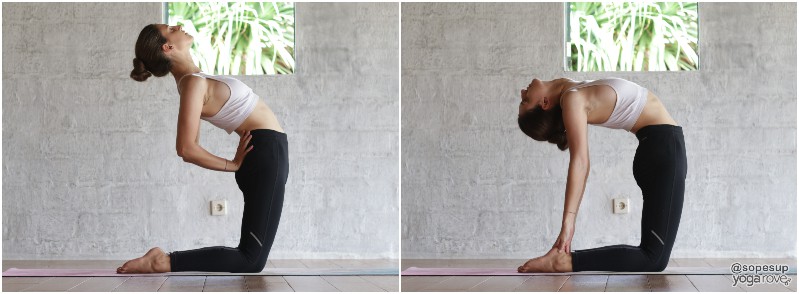
This is an amazing chest opener as well as a great pose for improving mobility in your back. I do suggest warming up before trying this with a few Cat and Cow’s (pose number 16) to prevent yourself from having an uncomfortable experience with this pose.
How to do Camel Pose:
- Start on your knees with the rest of your body off the floor.
- Place your hands on your hips, and start to look up, and slowly lift through your chest. You will naturally begin to form a natural backbend with your body.
- One at a time, bring your hands to your feet, and continue to push through your chest.
Modification: Use yoga blocks for this pose when first starting out. Place them by your feet at whichever height is right for you to create a milder backbend. You can slowly build up until you are ready to do the full pose. You can also choose to keep your hands on your lower back to support yourself in a mild backbend, as shown above.
18. Reclined Spinal Twist (Supta Matsyendrasana)
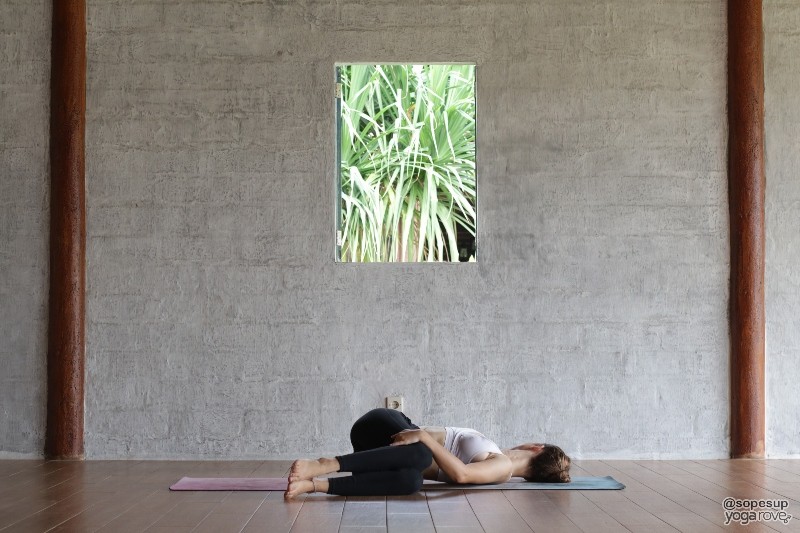
Twists are excellent for the spine, and are also extremely relaxing. There are so many different types of twisting poses, but this one is especially great for improving back mobility and relieving tightness and tension.
How to do Reclined Spinal Twist:
- Start on your back with your knees bent and feet on the ground.
- Bring your knees into your chest, and place your right hand on the outside on your left thigh.
- Slowly begin to drop your legs all the way over to the right side, and use your right hand to deepen the twist.
- Make sure you keep both shoulders on the ground and don’t let yourself turn over to the right with your legs. This will make the stretch lose effectiveness.
- Stretch your left arm out straight to the other side and let your gaze stay straight on the ceiling or fall over to the left.
- Slowly come back to center then repeat on the other side.
19. Child’s Pose (Balasana)
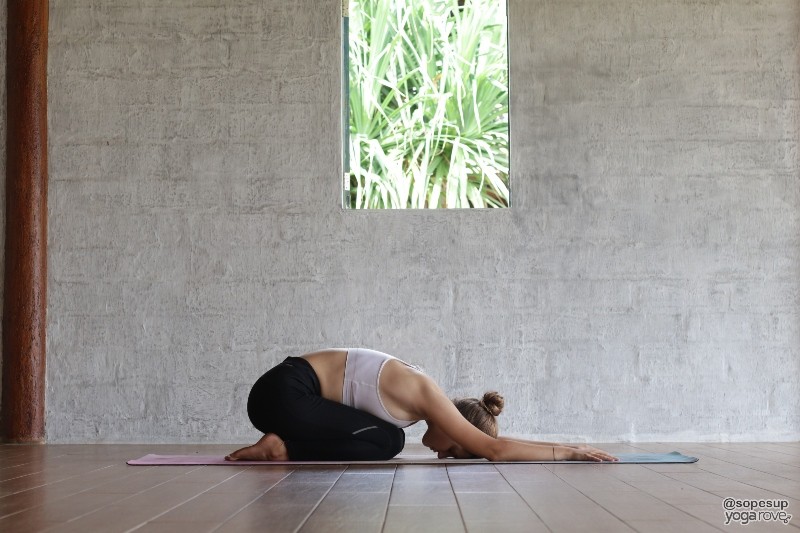
Child’s pose is often used as a resting pose during yoga sequences, but is also a great pose for improving spine flexibility. There are different variations you can do but the one I’m going to show you is the best for relieving tension in your back.
How to do Child’s Pose:
- Start on all fours with legs hip distance apart.
- Slowly start to push your butt back onto your heels and let your forehead come to the floor with your top body.
- Stretch your hands forward as much as you can by slowly inching them forward with each exhale.
Modification: If you want to get even more of a stretch, try walking your hands over to one side of your body to get a good side stretch. Do this on your exhale, stay here for a few breaths, then repeat on the other side.
20. Standing Forward Fold (Uttanasana)
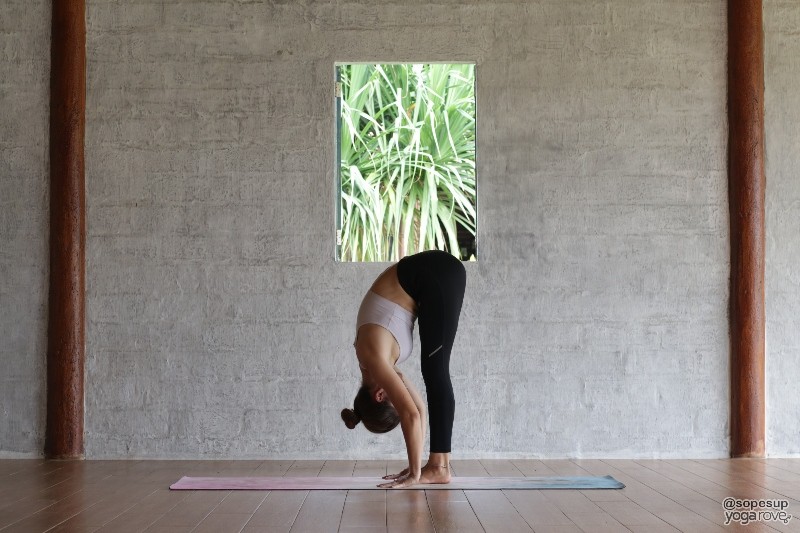
This is the last pose on the list, and one of my favorites I might add! This is a great pose to release tension and stress, improve mobility, and really feel your body.
How to do Standing Forward Fold:
- Start in Mountain Pose.
- On your next inhale, lift your arms up overhead, then on your exhale, bring your hands together and slowly dive down your center until you touch the floor.
- You can also place your hands on your hips, and then slowly hinge forward, then place your hands on the floor.
- If you can’t touch the floor, you can either place your hands on your shins, or you can use blocks to to lessen the space between the floor.
- Make sure to keep you back straight in this pose, and really lengthen through your spine.
- You can use a strap here as well to wrap around your foot and use the strap to sink a little deeper.
Modification: You can use a strap, or try placing two blocks by your feet and adjusting the height for more support.
I hope you enjoyed this list of poses and they serve you well 🙂 I have created an infographic to help you remember all the poses!
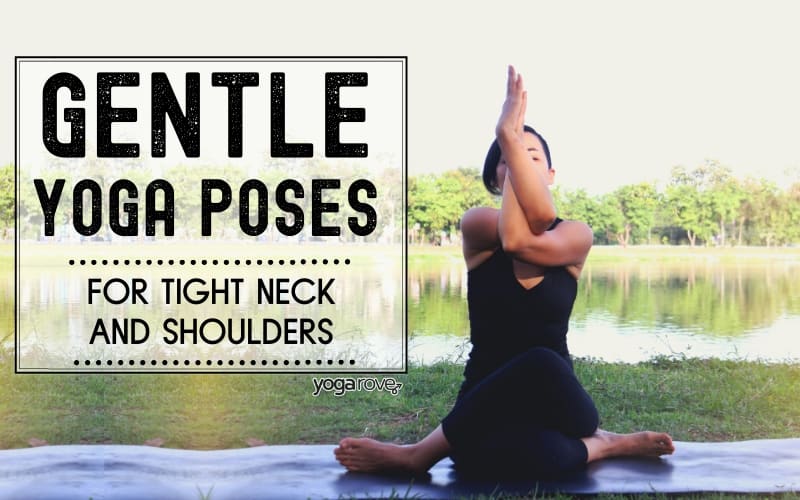
Related Yoga For Flexibility Articles:
- Full Split Guide for Beginners
- Flexibility Yoga Routine You Can Do in 10 Minutes
- Why Flexibility is Important
Ally is a Registered Nurse, Registered Yoga Teacher, and Co-Founder of Yoga Rove with her husband Victor. She first started yoga over 7 years ago when she started her nursing career to combat the physical and mental strain, and now loves to teach and help others.

I appreciate your great service. Thank you very much for your kind advice for the beginners like me.
So happy to be able to help! 🙂 Feel free to email us anytime with comments or questions!
Good
Glad you enjoyed it Srinu 🙂
This is perfect, thank you Ally. Is the idea to practice ball of them each time or pick a few from each section? Thank you
Glad you found it helpful Abi! You can do either depending on how much time you have and how often you practice. Just be mindful of how you feel while practicing to not push yourself too far 🙂