

This post may contain affiliate links. Please read our disclosure for more info.
Looking to lose a few pounds, but absolutely hate going to the gym everyday? Try this 15 minute yoga routine for weight loss. Yoga is actually one of the best exercises to tone, build lean muscle, lose weight, and decrease cravings.

But the types of poses you do and how you implement them definitely play a huge role in how fast you achieve the results you are looking for. We are going to show you a simple 15 minute yoga routine for weight loss any beginner can do to jumpstart your weight loss, boost your metabolism, and get a lean, toned body while building your yoga practice.
How Yoga Can Help You Lose Weight
I know there are a ton of skeptics out there regarding whether yoga can help you lose weight, more so because I was one of them. Here are five science backed reasons for why you should make yoga into a consistent practice if your goal is weight loss:
- Yoga helps you build lean muscle. Yoga is a body weight based workout, which has been proven to be just as effective in building strength and lean muscle as free weights. The best part is, the more lean muscle you build, the fast your metabolism becomes, accelerating your fat loss.
- Yoga decreases stress. Cortisol is a killer when it comes to losing weight, and yoga has been shown to significantly decrease it compared to other exercises.
- Certain types of yoga are great cardio workouts. Yoga can be an excellent cardio workout, if you do the right types of yoga, such as Vinyasa or Ashtanga yoga. These types involve fast paced “flowing” sequences that kick up your heart rate and test your endurance.
- Yoga boosts your metabolism. As stated earlier, muscle and metabolism go hand in hand. The more lean muscle you build, the faster your metabolism will become, causing you to naturally burn more calories at rest.
- Yoga changes your eating habits. Stress, hormones, and habit are all factors in the food choices we make. Instilling a healthy practice like yoga that decreases stress and has been shown to balance other hormones effecting weight gain, can significantly effect the food choices you make, your hunger, and overall eating habits.
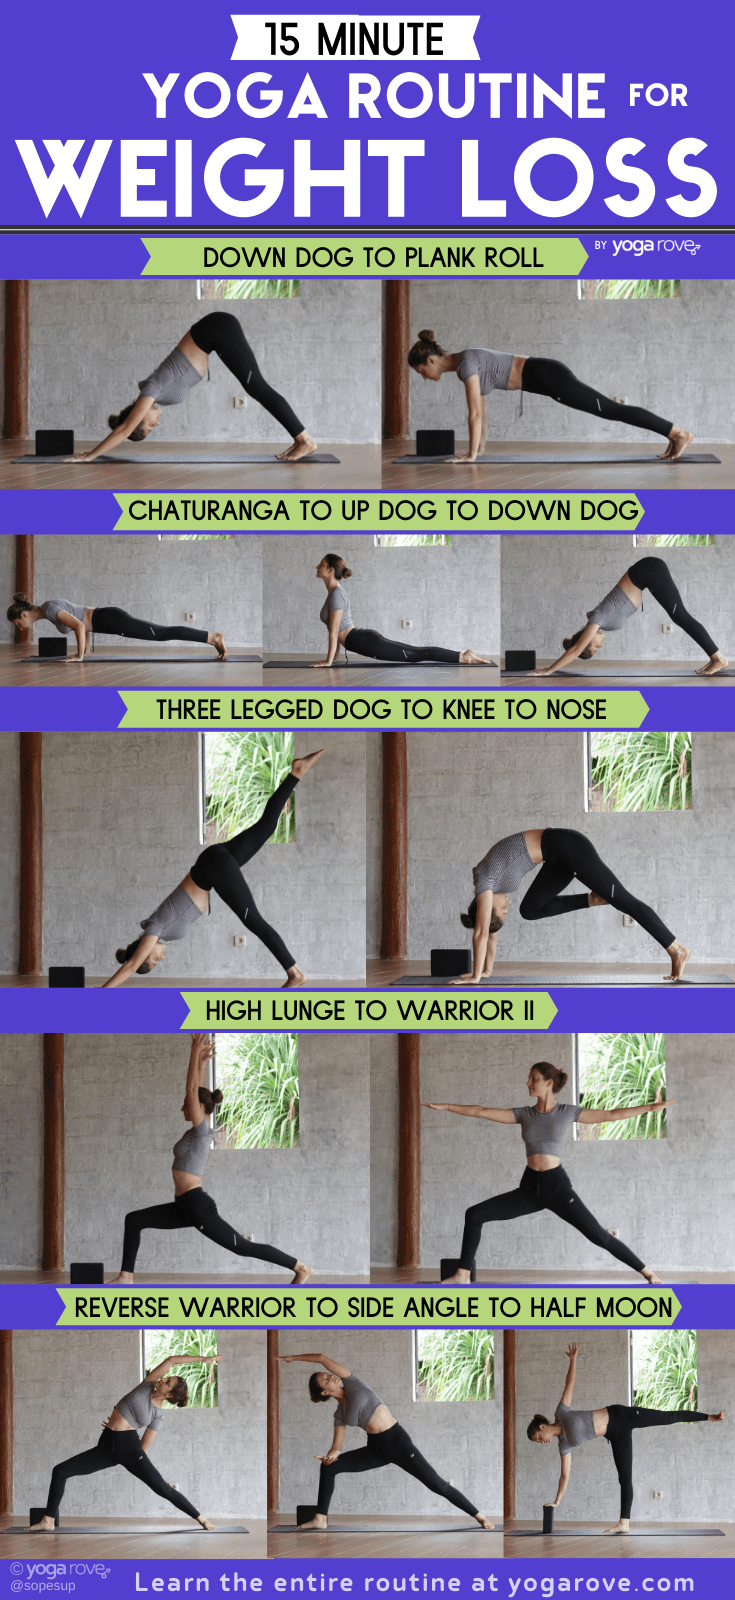
15 Minute Yoga Workout for Weight Loss
The following poses create a dynamic routine targeted to increase your heart rate and burn fat. I broke them up into two sections, as the first section is meant to be repeated 4 times before you take it down to the floor for the second section. Here are the poses:
Part I
- Downward Facing Dog to Plank Roll Flow
- Chaturanga
- Upward Facing Dog
- Downward Facing Dog
- Three Legged Dog to Knee to Nose Flow
- High Lunge Pose
- Warrior II
- Reverse Warrior to Extended Side Angle Flow
- Half Moon
- Standing Forward Fold
- Plank
Part II
This routine is made up of mini “flows” made up of two poses. This promotes you to get moving, works your endurance, and is great for burning fat and building strength. Have fun and go at your own pace! Let’s get started:
1. Downward Facing Dog to Plank Flow- 3 rounds
Downward Dog and Plank are both equally effective poses for weight loss along, and when put into a flow they become extra powerful. This is a great dynamic flow to build up the heart rate while working the arms and core.
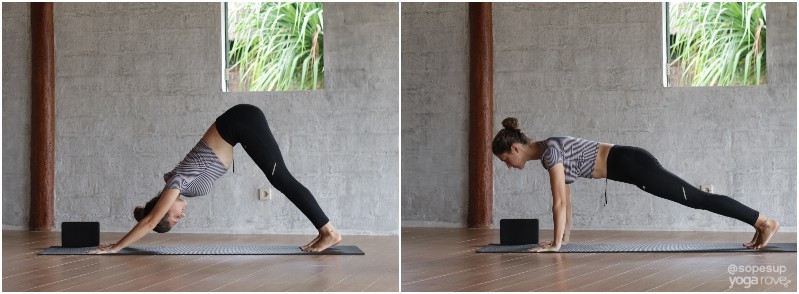
How to do Down Dog to Plank Flow:
- Start on all fours in tabletop position with your toes tucked and hands under shoulders.
- On your exhale, push your hips up and back into Downward Facing Dog.
- Engage your core, lift through your arms, and extend through your heels. Take a moment to pedal out your feet one at a time to create space and loosen up the hamstrings. Then hold for 3 breaths.
- On your exhale, lift your heels as you come onto your tiptoes, and roll forward into Plank Pose. Make sure your spine is straight, your navel is pulled in, and you are engaging both your arms and legs. Hold here for 3 breaths.
- Now on your exhale, come back into Downward Facing Dog, holding for three breaths, and repeating the flow three times.
2. Chaturanga- hold 3 breaths
Chaturanga is one of the best poses to build core and upper body strength. If you are unable to do a full Chaturanga, don’t worry, we will provide a modification below 🙂
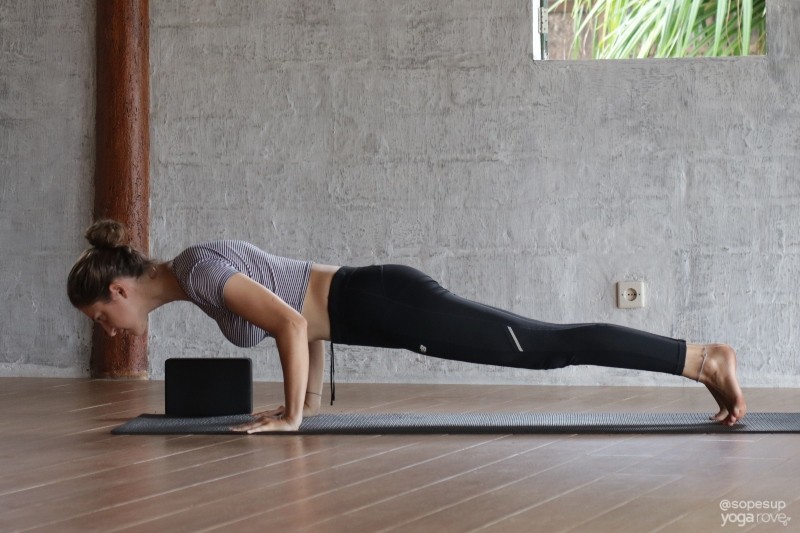
How to do Chaturanga from Plank:
- From Plank Pose, first make sure you are in good alignment with your back straight, core and legs engage, and your arms in line with your shoulders.
- Hug your elbows tightly in toward your sides, then slightly adjust your body weight forward.
- Begin to bend your elbows as if lowering yourself into a pushup, with your elbows still squeezing your sides, and then hold when your arms get to 90 degrees. Hold here for 3 breaths.
Can’t do chaturanga yet? No worries, simply come into Knees-Chest-Chin pose by engaging your core and dropping your knees, then your chest, then your chin. You will be building strength and still get a great core workout from it!
3. Upward Facing Dog- hold 3 breaths
Upward Facing Dog commonly comes after Chaturanga as apart of a vinyasa flow and is great to practice to build strength and lose weight. The key here is to use your core to make make sure your knees do not touch the ground during the transition.
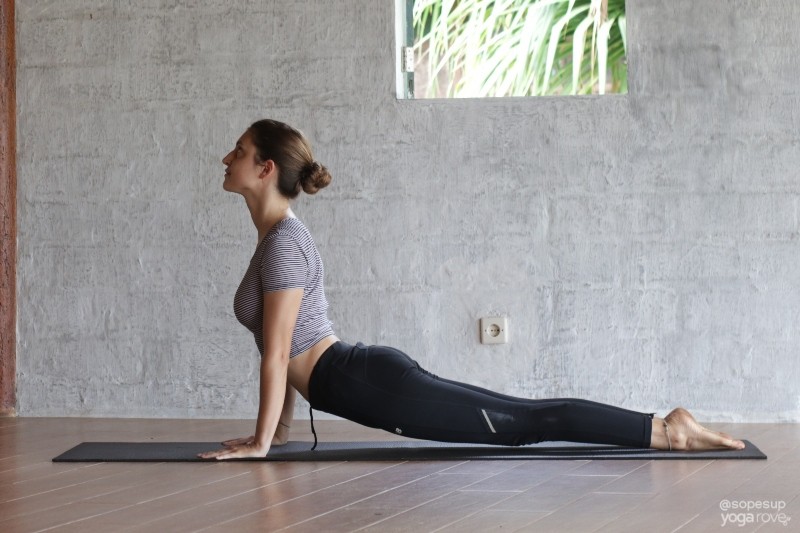
How to do Upward Facing Dog from Chaturanga:
- In Chaturanga, flip your feet so the tops of your feet are now touching the ground. Engage your legs.
- Engage your core and straighten your arms while you lift through your chest and bring your gaze upwards to come into Upward Facing Dog.
- You arms, legs, and core should all be engage and the only parts of your body that should be touching the ground are your hands and the tops of your feet.
4. Downward Facing Dog- hold
To complete the flow, come back into Downward Facing Dog. You should feel your heart rate increasing, and your core and arms engaging. Accept it and love it! Make sure once you get here to take a deep cleansing breath and to regroup from the fast paced movement you just did, and to prepare for some more!
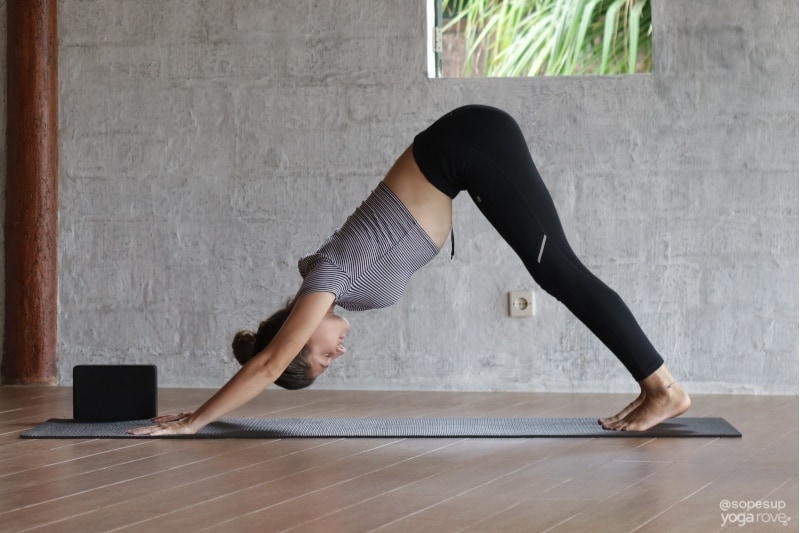
How to do Downward Facing Dog from Upward Facing Dog:
- In Upward Dog, flip your feet so you are now back to balancing on your toes.
- As you do this, push your hips up and back to come into Downward Facing Dog.
- Take a big inhale, then exhale out your mouth to regroup.
- Bend one knee at a time if needed to release any tension, then go back to stillness in the pose.
Related article: How to Do Downward Facing Dog if You’re Inflexible
5. Three Legged Dog to Knee to Nose Flow- 3 rounds
This is another flow of two poses that is great for building up heat in the body and testing your strength. Remember to keep good alignment throughout and try not to collapse through your chest.
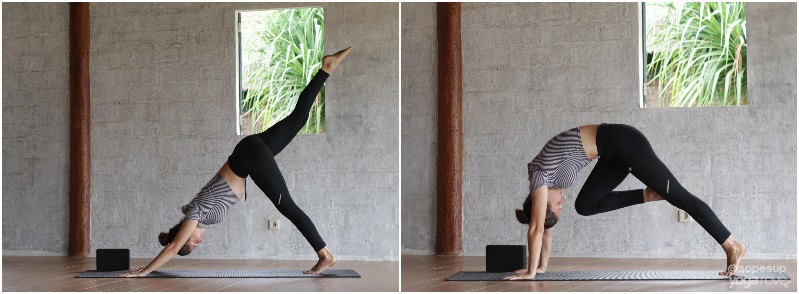
How to do Three Legged Dog to Knee to Nose Flow:
- From your Downward Dog, lift your right leg into the air and point through the toes. Lift the leg up as high as you can. Engage your arms and core for support and to maintain alignment. While you’re doing this, ground through your left foot and keep pushing through the heel.
- Stay here for 2-3 breaths, then shift your body weight forward as you slightly round your spine as if you are in Cat Pose and bend your right knee and bring it towards your nose.
- Stay in Knee to Nose pose for three breaths, really squeezing your knee and reaching it towards your nose, then on your next exhale straighten your right leg back into Three Legged Dog.
- Go through this flow three times.
6. High Lunge Pose- hold 5 breaths
High Lunge is a great pose to tone your legs and build up strength in your legs and core. Remember to sink into your front leg to intensify the pose.
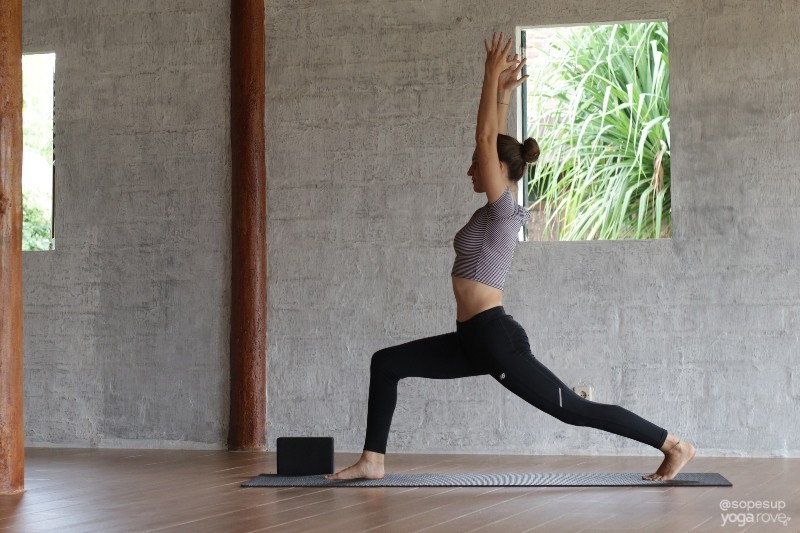
How to do High Lunge from Three Legged Dog:
- From Three Legged Dog, instead of coming into Knee to Nose, bring your right leg all the way through to in between your hands, and ground the foot flat.
- Extend through the heel in your back foot, where you should still be on your toes.
- Ground your feet and engage your legs, with your front leg bent at a 90 degree angle, then use your core to lift your torso up as you sweep your arms up above your head.
- Drop your shoulders away from your ears and extend through your fingertips. Lift through your chest.
- Continue to sink lower into your front leg and engage your back leg as you stay in this pose for 5 breaths.
Related article: The Best Yoga Poses for Beginners
7. Warrior II – 3 breaths
The transition from High Lunge to Warrior II is very simple and is a great challenge for your legs! When you feel your leg shaking and want to come out, try to pull through! You are only here for 3 breaths.
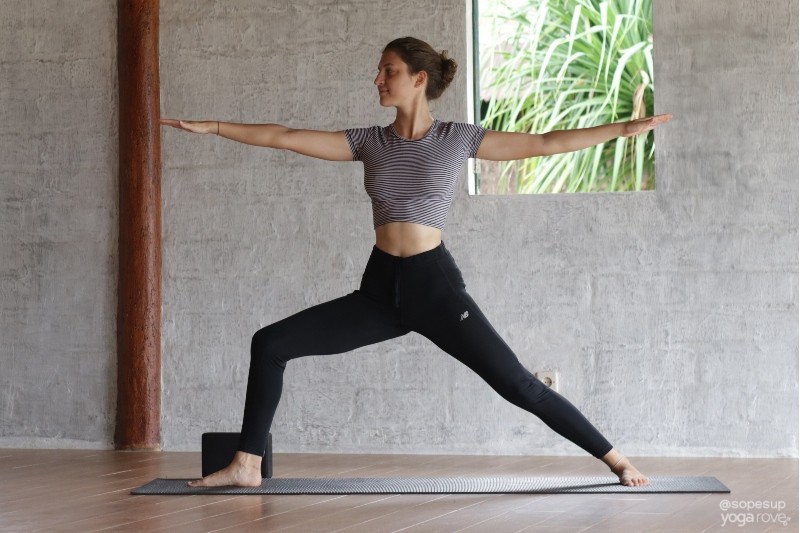
How to do Warrior II from High Lunge:
- From High Lunge, rotate your back foot so it is planted on the ground at angle of about 10 o’clock.
- As you do this, float your arms from above your head to come down so they are even with your shoulders, extending towards the front and back of the room. Let your gaze fall over your front fingertips.
- Keep grounding through your back foot and sinking into your front leg. Keep lifting through your chest and extending through your arms.
8. Reverse Warrior to Extended Side Angle Flow- 3 rounds
The third and final mini-flow! You have already been engaging your legs from High Lunge and Warrior II, now this flow will add in more of a challenge while accelerating your heart rate.
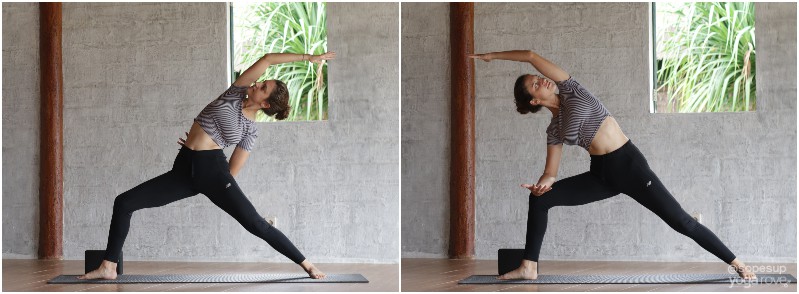
How to do Reverse Warrior to Extended Side Angle Flow:
- From Warrior II, first make sure your body is engaged and you are sinking into your front thigh. Then on your exhale, float your left arm to come down your back leg, reach your front arm up overhead, and slightly arch your back as you lift through your chest.
- Make sure to keep the bend in your front leg at 90 degrees.
- Stay here for 1-2 breaths, then float your right forearm to rest on your front thigh, as you lift your back arm up overhead now towards the front of the room.
- Remember, keep the leg bent! Keep extending through your top arm and lift through your chest, using your core to keep your body upright.
- Stay here for 1-2 breaths, then repeat the flow 3 times, following your breath.
9. Half Moon Pose- hold 3 breaths
Half Moon will give your legs a break from all those power poses you just did and instead focus on lengthening and stretching. But don’t be fooled, this pose is great for toning your abdomen and hips.
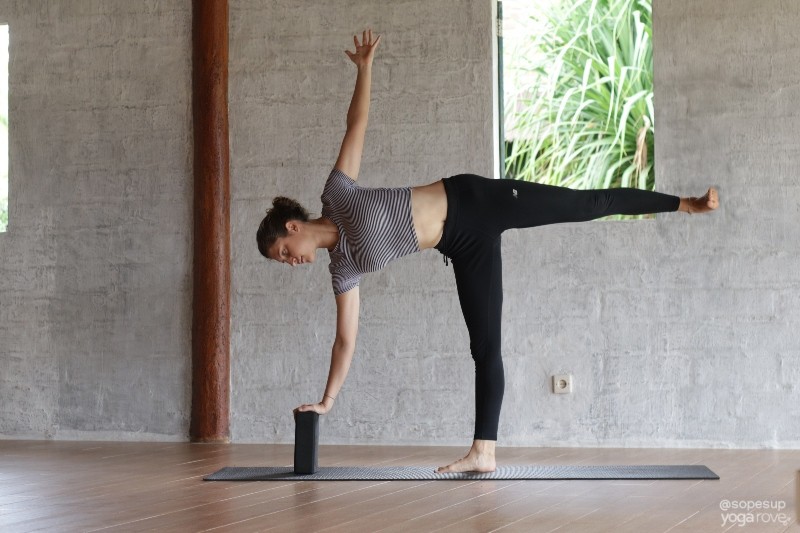
How to do Half Moon Pose:
- First, from your Extended Side Angle, come back to a neutral Warrior II.
- Begin to shift your weight into your front leg and begin to cartwheel your front hand down towards the ground so it lands at 2 o’clock, slightly forward and to the side of your right foot.
- As you are doing this, lift your back leg up into the air as high as you can and straighten your front leg.
- Your left arm comes up towards the ceiling. You can either choose to keep your gaze towards the ground, or bring it up towards your fingertips to challenge your balance.
- Keep extending through your back leg and flex your foot. Engage your core to keep your spine straight and lift through your chest.
10. Standing Forward Fold- hold 3 breaths
Okay, no a little break! Although Standing Forward Fold is a greatly known resting pose, it is actually shown to be beneficial for toning the abdomen and sides. Just make sure you don’t completely collapse through your chest while in it.
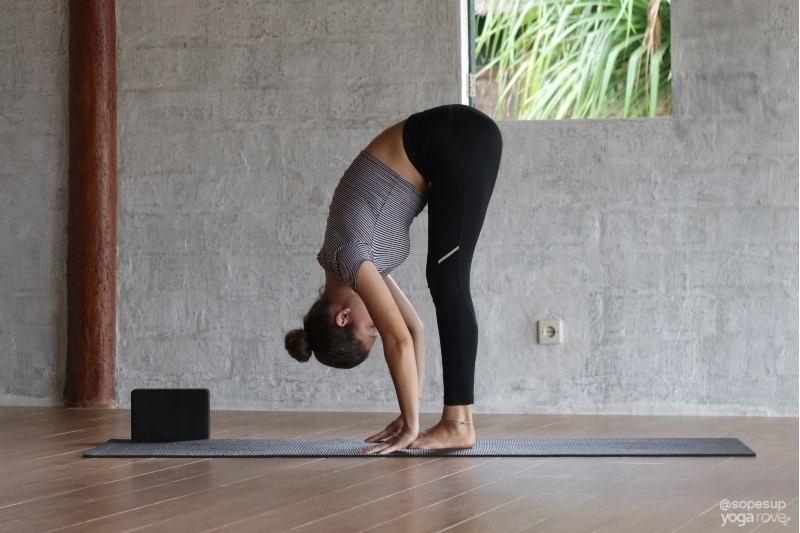
To do Standing Forward Fold from Half Moon:
- From Half Moon, bring your left hand down to touch the floor and bring your lifted leg to hip height with toes pointing towards the floor to come into modified Warrior III for a brief second.
- Bring your left foot to meet your right with a slight bend in both knees.
- Straighten both legs as you lengthen through your spine, then completely fold over towards the ground.
- Use your core to fold deeper into yourself and try not to lose any engagement in your body. Keep reaching, engaging the legs, arms, and abdomen as you stay here for 3 breaths.
11. Plank- hold 3 breaths
And now to Plank holds. There’s no better way to tie up one part of a sequence than to challenge your tired body with a plank! Coming back to Plank also makes it smoother for you to transition back into step 1 of this sequence to repeat on the other side.
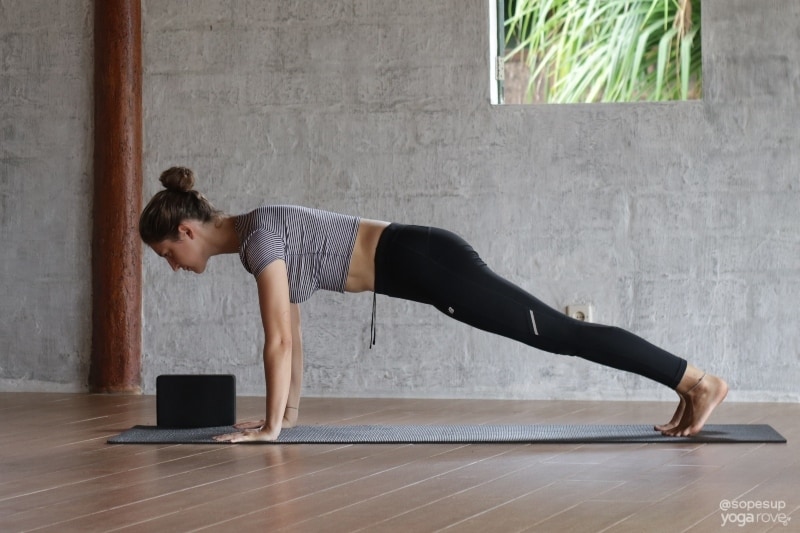
How to do Plank from Standing Forward Fold:
- From Standing Forward Fold, bring both hands to plant on the ground, then step one leg back at a time to come into Plank.
- Engage your core and make sure your pelvis is inline with the rest of your body. Do not let your arms externally rotate, the insides of your arms should be facing forwards.
- Extend through the heels and engage the legs, arms, and core as you hold here for 3 breaths.
Now repeat the sequence, switching to the other side.
You are in the home stretch! The next part of this sequence is short and is all on the floor, and also involves your resting pose.
11. Boat Pose to Low Boat- hold 5 breaths each
This step involves two different variations of Boat Pose that you will hold for 5 seconds each. These two poses are great for toning both your upper and lower abdomen and building up more heat before you rest.
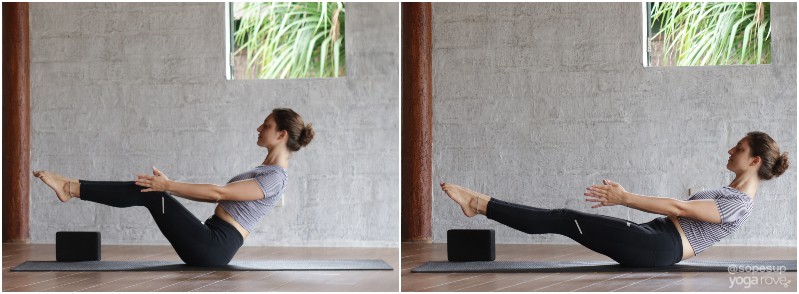
How to do Boat Pose to Low Boat:
- Start seated on the ground with a tall spine and your legs out in front of you. Hands should be flat on the floor by your sides.
- Bend you legs and bring your feet flat on the ground, knees and legs touching.
- Slightly lean back until you feel your core engage a little bit, then lift one leg into the air at a time until both are bent at 90 degrees above the ground. Bring your arms off the ground straight out along your sides.
- You can stay here, or if possible, straighten both legs to come into a “V” position for full Boat Pose. Make sure to stay lifted through your chest and engage your core.
- Hold here for 5 breaths.
- Slowly begin to lower your legs and upper body towards the ground until you are hover just above the ground with your shoulders, head, neck, and legs.
- Extend through your legs and hold here for 5 more breaths, then slowly release to the ground.
Related article: 10 Minute Yoga Workout to Work Your Entire Core
12. Bridge- 5 breaths
Bridge pose is one of the top yoga poses for weight loss, and targets many areas of the body, including your abdomen, legs, and glutes. This is a great restorative yet strengthening pose to end a yoga sequence before rest.
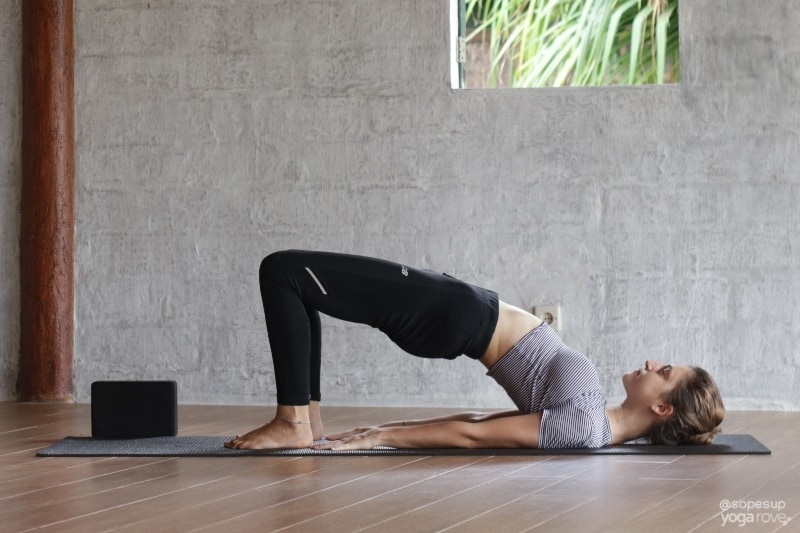
How to do Bridge Pose:
- Once you are completely on the ground, bend both legs and ground both feet on the mat. Feet should be about inner hip distance apart. Your arms should be straight by your sides, with fingers pointing towards your toes.
- Slightly lift your shoulders just enough to adjust yourself so your shoulder blades are more underneath you. Lengthen through your arms and try to see if you can brush the heels of your feet with your fingertips.
- Engage your core, then on your exhale lift up off the ground, squeezing your pelvis in towards your belly button. Make sure to keep both your shoulders and arms completely grounded.
- Hold here for 5 breaths then slowly lower one vertebrae at a time to the ground.
13. Savasana- Rest
You made it through! You did all that hard work and now it is time to rest. Please don’t skip this part! Resting after yoga is pertinent to developing a strong yoga practice and resting your mind actually can help aid in weight loss due to its ability to help you destress and unwind.
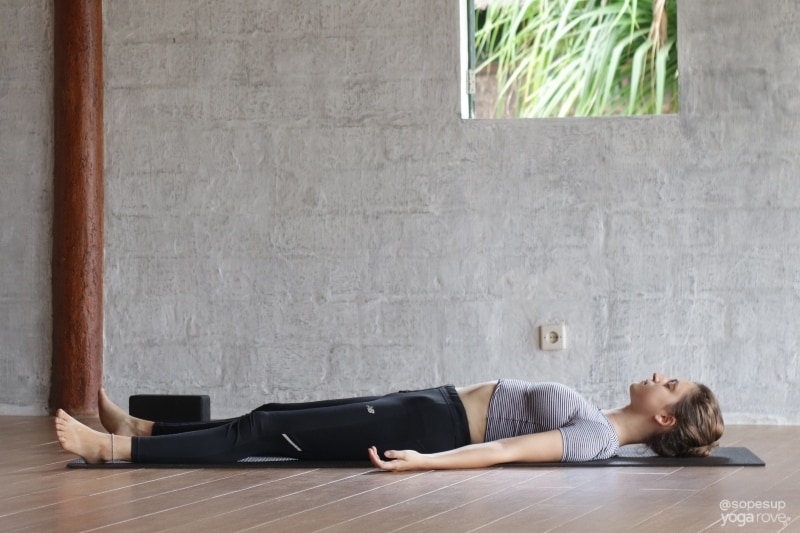
How to do Savasana:
- Once you are down from Bridge Pose, unbend your legs and allow them to completely lay flat on the ground.
- Let your arms rest by your sides as wide as is comfortable. Let your feet fall to either sides without using any effort to keep them in alignment.
- Completely relax everything in your body, including your face, chest, arms, fingers, legs, and feet. Try to do a body scan and check for any tightness anywhere, then release it.
- Allow yourself to completely let go and relax. If your mind wonders, do not freak out. Just try to focus on your breath and come back to it.
- Stay here for as long as you need.
I hope you enjoyed this 15 minute yoga workout for fat burning and weight loss! Try to challenge yourself to doing this 3 times a week for a month! I would love to hear your results in the comments below.
What to save this routine for later? Pin our infographic:
Ally is a Registered Nurse, Registered Yoga Teacher, and Co-Founder of Yoga Rove with her husband Victor. She first started yoga over 7 years ago when she started her nursing career to combat the physical and mental strain, and now loves to teach and help others.

much informative very good advice
and exercises thank for sharing this great content
Absolutely! I’m glad you found it helpful! 🙂
Awesome flow Ally. Loved the alignment tips
Looking forward to more!!
Glad you enjoyed it Jyoti! 🙂
Awesome workout!
So glad you enjoyed it!
If you posted a video of the same while working out in real time, it would be easier for us to follow through.
Should I do the same yoga routine every day to achieve results?
Hi Zeba,
We will be coming out with a new video course as well as starting our YouTube channel soon so stay tuned for that 🙂 And it depends on where you are currently at- if you are new to yoga and just starting out I would suggest starting off with practicing this routine 3 times a week and then increasing the intensity over time. Hope that helps!
Your blog and instagram page are great!. Thank you for being so helpful everytime I have a question. God bless you.
Thanks!
So happy to be able to help Maryam! 🙂
Great flow Ally. I’m glad you found it helpful.
So glad you enjoyed it Ipuk 🙂
I would love to have a video of this or see it on a utube
We are definitely working on creating videos for all of our routines! 🙂